This is a rough draft of what will be a living document. Expect updates throughout 2026. Big shout out to Tobias Link and Nick Baggaley, both or whom are helping with editing and content.
I’ve been hesitating for a long time to write up information about ‘standard’ methods and practices for retrofitting and re-bolting in the Rockies. On one hand, there are already loads of great resources out there on the topic, and what could I possibly have to add? On the other, sometimes that volume of information actually makes it hard to find what specifically applies to us as Rockies climbers.
It’s finally time to write that document. What I want to accomplish here is not to exhaustively detail every nuance of every relevant method. Rather, I want to provide an overview of:
- The fixed protection we typically find in our mountains.
- The hardware we replace that stuff with.
- The tools and tactics we use to accomplish it.
- The reasons you might choose one type of hardware, tool, or tactic over another. This will be sprinkled throughout, but we’ll also tackle it more exhaustively in it’s own section.
This is not going to be an ethics post. I’m going to make a fairly clean separation here (with one exception). This post is not about ethics, access, or community consensus. It’s about the hardware and mechanics. I’ll leave the other aspects for a separate discussion.
Nothing here is a true ‘standard’. I am a member of TABVAR’s board, but TABVAR does not set standards, I’m not on any standards committees, and much of the work we do in our local area falls under the genre of “don’t ask don’t tell” from an access perspective.
I’ll also mention that you don’t need to run out and buy tools and hardware if you want to help. TABVAR provides hardware for retrofitting routes, and has all of the equipment described available for experienced retrofitters to use. The community can also provide mentorship to help get you there. Just reach out.
A note on dimensions/sizes: There are too many possibilities to list them out every time a wrench or nut comes up. Towards the end there’s a whole section about sizes, reference that as needed.
What we retrofit
Wedge Bolts
We have rusting non-stainless ⅜” wedge bolts scattered throughout the Rockies. They were still in use as late as the early 2000’s.
Some of the bolts located in dry environments are still in reasonable shape. Others that have seen running or seeping water are scary as hell. Winter climbs in parcticular are often located in wet areas.
Self-drive bolts
These are everywhere. If you see a hex head bolt or a socket head cap screw in the Rockies, it’s most likely a self-drive. The hex-head Rawl 5-piece bolts that are somewhat common in the US are not really found here. As a rule, self-drives are not stainless steel.
Placed well, with no corrosion, in good rock, they can be reasonably solid. But, they are still only 1 ¼” long and you never know what’s inside the hole until you pull them out. They’re generally not to be trusted.
Home-made hangers
There was an era of home made angle-aluminum hangers that seems to have overlapped with modern wedge bolts. Like a self-drive, possibly strong enough, but not to be trusted. You’ll also find rusting Leeper hangers, and some other less common improvisations.
These are likely going to be on an older wedge bolt or self-drive.
Pitons & Aid protection
A lot of older trad routes were put up with some amount of piton protection. Some old routes also had fixed points of aid, like rivets, spits/sticht pitons (see below), and quarter-inch bolts. This stuff is less common, but it is out there.

Time for my ethical diversion. Without going too far down a rabbit hole, there are very few people who I think should be making decisions about updating pitons and aid hardware. It absolutely should not be a 1:1 bolt retrofit, and it takes a depth of experience and local knowledge to make smart choices about how and when it should be replaced.
If you find yourself contemplating replacing hardware like this, reach out to some of the core people in our community and get some mentoring / consensus before altering and potentially permanently damaging these lines.
What we don’t have
To our knowledge, we really don’t have sleeve-bolts in the rockies. If you see a protruding stud with a nut, it’s probably a wedge bolt. If you see a hex head bolt, it’s probably a self-drive.
What we replace with
Stainless
Almost all hardware used in retrofitting should be stainless. 316 stainless steel or other high-corrosion resistance alloys are preferable, but in our climate, 304 stainless steel seems to be fine. There also seems to be no issue with mixing 316 and 304 stainless hardware in our climate (for example, 304 bolt with a 316 hanger). Titanium is fine but prohibitively expensive and unnecessary.
The only two possible hold outs in this regard are fixed draws and lower-off carabiners, which are described below.
Glue-in bolts
On single pitch routes, glue-in bolts are the go-to. Once installed, they will last for literal lifetimes without maintenance. There is some overhead in learning to use them correctly, but once you have some experience they can be installed quite efficiently and cleanly.
Critical: The type of adhesive is extremely important. Only certain formulations are suitable at all, and there are temperature and wetness considerations. Sika AnchorFix 2020 is suitable without significant caveats at temperatures of 5°C or higher in a dry or damp (but not wet) hole. Do not deviate from that product and conditions without thorough knowledge of the suitability of your alternative and the conditions it can be applied under.
Critical: Hole cleaning is also extremely important. Brushes are essential, as is a high-flow blower. This means a blow pump or a motorized unit with an extension to reach the back of the hole. Lung-powered tubes, squeeze bulbs (e.g. for camera cleaning), and leaf blowers are not suitable.
½” Wedge bolts
In winter, glue-in bolts can be challenging to work with due to the temperatures involved. In a crag environment, it’s often still possible to make it work, but half-inch wedge bolts are an alternative that still lets you re-use existing holes.
Stainless ⅜” bolts
In a multi-pitch or alpine setting, it is again still possible to use glue-ins. However, sometimes it’s just too logistically challenging. One example is mixed protection routes where you might only be encountering bolts sporadially, and you don’t want to use a new nozzle for every bolt.
Glue Capsules
These are not common in the Rockies yet, and require even more experience than normal glue-ins. But, they can be a valid option to use glue-ins in a more remote or mixed-protection environment.
Anchors
- Wedge bolts - Pre-built chain stations, are preferable. Second choice is home-made stainless steel chain / quick-link stations. Last choice is individual rap rings.
- Glue-ins - Home-made stainless steel chain / quick-link stations is the go to.
- Single-pitch lower offs - When there is low potential for the climber to move above the anchor, steel lower-off carabiners are preferable. Mussy hooks are preferable for high traffic routes. Stainless steel is preferable, but it may not be available at a reasonable price. This isn’t the end of the world, as these items may need to be replaced due to rope wear anyway before consequential corrosion occurs.
- Multi-pitch lower offs, or single-pitch where a climber may move above the anchor - Rappel rings. On a chain anchor, a single ring located at the bottom of the anchor is preferred.
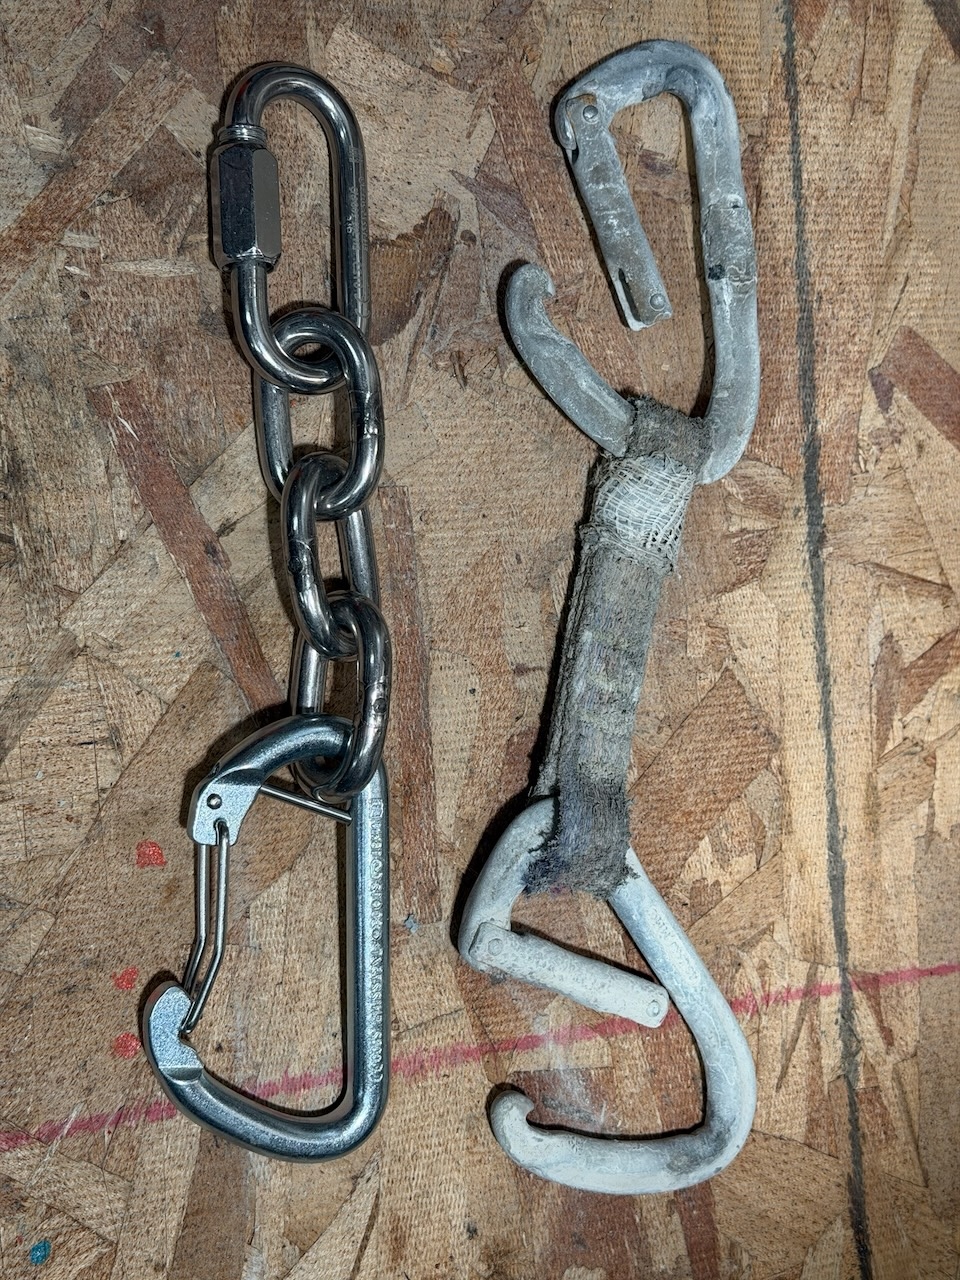
Fixed draws
Ideally, at least the quick link is stainless to facilitate maintenance. Ideally the cable/chain is also stainless, but this is less often the case. Again, ideally the carabiner is stainless, but this is even less likely. Improvements are coming in this space.
Solid gate carabiners are not suitable for high-water environments. The springs on solid gate non-stainless carabiners can corrode quickly. Wire gates are preferable.
Shrink-wrapped non-stainless draws are also not suitable for high-water environments. Water can become trapped behind the shrink-wrap / plastic and cause non-stainless dogbones to corrode quickly. Additionally, the shrink wrap/plastic can prevent a visual inspection.
What we use (Tools & Tactics)
Placing glue-ins
Gear:
- A caulk gun, with high-thrust (>1:20 thrust ratio) being almost mandatory. Cheap ones can be difficult or impossible to use with thick epoxy, especially in cold temperatures.
- Sika 2020 adhesive
- Trash bucket
- Popsicle sticks
- Rag / paper towels
- Latex gloves
- Blow out pump
- Brushes
Bolt puller
With a drill driver and a bolt puller, you can extract wedge bolts as long as the threads are in reasonable shape.
Gear:
- Coupler nut
- YABR / Doodad bolt puller
- Drill-driver (brushless)
- Batteries
- Hex Shank Drill Chuck Adapter
- Vice Grips
- ⅝” wrench for coupler nut
- 9/16” wrench for wedge bolt nut
- 11/16” or crescent wrench for hex-shank adapter
- Hammer
- Abrasive fluid
Pros: Not very messy, very good result. The hole can be re-used for ½ wedge bolt, a glue-in bolt, or patched.
Cons: Steeper learning curve, can be inconsistent, potentially more time consuming, doesn’t work on bolts with damaged threads.
Core drill
This can be a more consistent way to remove any bolt. You need a drill-driver with a clutch (torque setting), core drill rig, and water.
Gear:
- Core drill bit
- Core drill rig (including hose, valve, bulb pump)
- Water bag
- Drill-driver (brushless)
- Batteries
- Vice Grips x2 for bit removal
Pros: Very reliable. Hole can be re-used for glue-ins, or patched
Cons: The hole is large, so you can’t upsize to ½” bolts, and the patched hole is larger. You need a supply of water, and it’s much messier in an overhead environment. You need to be mindful of your clutch setting or you can shatter bits.
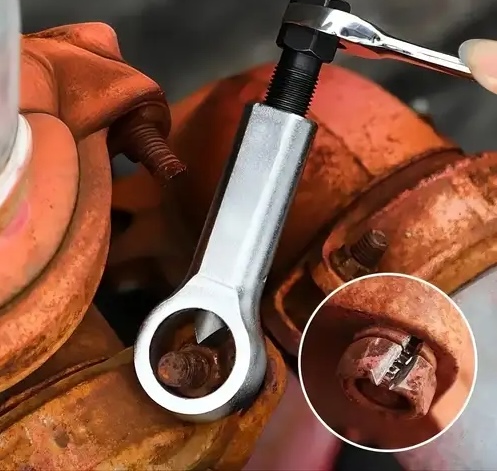
Nut Splitter
This is a tool for snapping seized nuts. This can be a good way to get the nut/hanger off a ⅜” bolt.
Gear:
- Nut Splitter
- Wrench
- Vice grips can be used to add leverage to the wrench
Pros: No battery, no sharp spinning things Cons: High effort, a bit heavy
Angle Grinder
The “I’m not asking” version of removing things. It’s the only practical way to remove a glue-in bolt. It’s also an effective way to split seized nuts.
Gear:
- Angle grinder
- Cutoff disk/wheel (Not grinding)
- Disk installation/removal tool
- Batteries
- Safety glasses
Pros: Works every time
Cons: Heavy, battery powered, dangerous operating a spinning blade next to ropes.
Rotary Tool (Dremel)
The “I’m asking, but I’m pretty insistent” version of removing things. Very effective at removing seized carabiners or quick links. Not so effective on bolts or nuts. One step down from this is a small hacksaw.
Gear:
- Dremel
- Cutoff disk/wheel (Not grinding)
- Batteries
- Safety glasses
Pros: Lighter, still fast compared to a hacksaw
Cons: Still not light, battery powered, dangerous operating a spinning blade next to ropes.
Bolt Breaker
Snap off wedge bolts
Gear:
- Bolt breaker
Pros: Relatively light, works as long as you’ve got the nut off and enough thread showing
Cons: The bolt is still in the hole. You can patch it, and technically place a glue-in sort of on top of it, but really this is only appropriate when you’re moving a bolt significantly and just want to cover up the old bolt.
Self-Drive extractor
A very light set of modified bolts that let you remove a self-drive from its hole. The hole can then be patched or used for a glue-in. These are not commercially available, but TABVAR has them for retrofitting use. You can make your own set if you’re handy enough / have access to a lathe.
Gear:
- 3x extractor bolts (or 1x bolt plus YABR, coupler nut, and adapter)
- Hex key
- Wrenches for removing the bolt from the sleeve
- WD 40 (used sparingly on the threads, don’t let it run down the rock or soak into the hole)
- Magnet stick
- Thread scraping hook
Pros: When it works, it’s an extremely clean and efficient process.
Cons: Only works when the self-drive is still in adequate condition. Sometimes bolts are seized, or the sleeve is so corroded that it just breaks and the threads no longer engage.
Drilling out self-drives
This isn’t a tool so much as a tactic. Drilling two ⅜” holds immediately under a self-drive compromises the rock enough that you can smack it down and out with a hammer or cold chisel. See PeakInstruction for more details.
Gear:
- Rotary hammer
- Batteries
- Junk ⅜ bit
- Magnet stick and scraping hook optional
- Hammer
- Cold chisel useful but optional
Pros: Efficient, reliable. The hole left behind is suitable to expand to 9/16” for a glue-in.
Cons: Trashes your ⅜” bit, and leaves a bit of a messy hole if your plan is just to patch.
Hammer / Cold Chisel
This is generally ineffective on ⅜” wedge bolts, but it does work on aid placements and self-drive bolts. A cold chisel lets you direct force very accurately, but even just a hammer (particularly one with a spike on the back) will let you smash the bolt/hanger off of a self-drive. Violence is key.
Gear:
- Hammer
- Cold Chisel
Pros: Very reliable.
Cons: You won’t be able to use a self-drive extractor after
Loosening/Snapping self-drives
Depending on the bolt type (cap screw with an allen key head, or standard bolt with hex head), a socket wrench, full-circle wrench, or longer allen key will generally provide enough leverage to either remove the bolt from a self-drive, or snap off the head. For standard bolts, the socket is best, with full-circle wrench being second best. An open wrench will often strip the hex head before you loosen or snap a seized bolt. Allen keys are good for removing socket head cap screws, but if they’re seized, it’s often easier to just go with the hammer/cold chisel method.
Gear:
- Wrench(s)
- Hex key(s)
- WD 40 (used sparingly on the threads, don’t let it run down the rock or soak into the hole)
Patching
Holes can be patched with extra / expired epoxy, a two part solid epoxy, or mortar/concrete powder mixed with water.
Gear:
- Caulk gun, old glue, gloves, popsicle stick trash bucket
- Two part solid epoxy, gloves
- Mortar powder, water, mixing dish, trash bucket, gloves, popsicle stick
When to use/do what:
Bolt Holes
Re-use - When existing bolt-holes are in solid rock, and in good locations, try to re-use them as much as you can
New hole, when existing bolts should be moved - If the old location is in bad rock, or does not work well for the actual climbing line, moving bolts makes sense.
New hole, when you aren’t physically or logistically able to remove the bolts - Alpine and mixed-protection multi-pitch routes can fall into this category. It’s not ideal, but sometimes it’s the most reasonable solution
Bolts
Glue-ins - Anytime you can, when you aren’t in one of the situations listed below.
Half-inch bolts - On winter routes, where you have time to re-use holes, these are a good glue-in alternative
Glue Capsules - In a multi-pitch mixed-protection environment where you are only replacing occasional bolts or anchors
⅜” bolts - In a multi-pitch environment where it’s impractical to use glue-ins. Before resorting to this, consider whether you could fix ropes or rappel in to make glue-ins practical.
Removing the nut on a wedge bolt
Generally an open wrench is adequate, but a full circle wrench is better, and a socket wrench is best. A deep socket works great for bolts that have a lot of thread sticking out). WD-40.
If the stud is spinning with the nut, try grabbing the exposed anvil of the bolt with vice grips to keep it from spinning. You can also try applying outward leverage against the hanger so that the stud binds up in the hold, for example wedge a screw driver behind the hanger, or clipping into the hanger and leaning backward.
Nut splitter - A bit of work, but very effective.
Hammer - On a crappy enough bolt, hammering it back and forth may work, but this can be pretty futile when the nut and hanger are still flush to the rock. Don’t bother with a cold chisel unless you have a sledge hammer to drive it with.
Angle grinder - “I’m not asking anymore.”
Removing a wedge bolt stud
When to use a Bolt Puller (aka YABR, Doodad, etc.)
- Overhead applications. The core drill is very messy in overhangs, because you’re flowing muddy water on yourself and your tools.
- When you want to up-size to half inch bolts. Core drill holes are too big.
- When you don’t want to carry the water for the core drill.
- When you’re just going to patch the hole, the resulting hole is smaller than the core drill hole would be.
- On poor quality bolts with intact threads. The bolt puller can be challenging on a modern hilti bolt, but quite fast on older, crappier or corroded bolts. Sometimes you don’t even need the extractor, just spinning is enough.
When to use a Core Drill
- Slab to vertical terrain, where flowing muck won’t be as messy to deal with.
- When you want to replace with a glue-in, so the increased hole size isn’t an issue.
- If you value the consistent behavior of the core drill. When used correctly, it works every time at almost exactly the same speed.
- On less-crappy bolts. The bolt puller can take a lot longer on better bolts, whereas the core drill doesn’t care.
When to use a bolt breaker bar
When you aren’t re-using the hole, it’s reasonable to snap the stud off and patch instead of removing it. It’s always better to extract it if you’ve got the time, but this is still a viable tool.
- Pull the stud out as much as you can. This will ensure that you have a bit of a gap at the bottom of the hole so you can counter sink the bolt after you break it off. Do this by cranking the nut tight before you remove the hanger, provided it isn’t seized.
- Loosen the nut. Remove the nut and hanger.
- Snap off the bolt using the bolt breaker.
- Countersink the remaining stud. Tap it in enough that it is at least flush to the rock surface. Deeper is better, especially if you plan to patch the hole. You can use a piece of the old bolt to direct the hammer blows, or sometimes even just the tip of your hammer.
- Ideally patch the hole.
Removing a hex-head self-drive bolt
Properly - Socket wrench, full circle wrench, or open wrench, in that order. These heads are easy to strip, so having a socket or full circle really does matter. Crescent wrenches and vice grips are often futile. WD-40 helps.
Cold chisel - Now we’re trying to smash it off, and a cold chisel makes it a lot easier to direct energy from your hammer
Just a hammer - Can be done, but depending on the quality of the rock / self-drive, it might take a while.
Removing a socket head cap screw self-drive bolt
Properly - Allen key, WD-40. You can also get hex bits for socket wrenches. You can slide a nut driver over the end of an allen key for better leverage.
Just a hammer - A hammer really does get the job done on these quickly by itself, but adding a cold chisel doesn’t hurt.
Removing a self-drive sleeve
Self drive extractor - If you’re going to patch the hole or upsize to a half inch bolt, the extractor will let you cleanly remove the sleeve (when it works).
Drilling out - If you’re replacing with glue-ins, the gash left by the ⅜” drill out method isn’t a problem and the method is very fast. Avoid this if you’re just going to patch.
Hammer - If you’re patching, and the extractor didn’t work, you can also try just smashing the exposed part of the sleeve with a hammer and perhaps a cold chisel. Ideally you end up with a shallow hole instead of a protruding sleeve.
Sizes
This section aims to capture all the dimensions you may encounter. I’ll keep adding to it. Note that where you see things like M8-1.25, the 1.25 is the ‘thread pitch’.
Wrenches
- 3/8” wedge bolt - 9/16” wrench
- 1/2” wedge bolt - 3/4” wrench
- 10mm wedge bolt - 17mm wrench
- Self drive, M8-1.25 bolt (typical) - 13mm wrench
- Self drive, 5/16”-18 bolt (socket cap, generally) - 1/4 allen key
- Bolt extractor coupler nut - 5/8” wrench
Nuts
- Bolt extractor coupler nut - 3/8”-16 to 1/2”-20
- 1/2” wedge bolt - 1/2”-13
Misc
- Hex drill-driver adapter for bolt extractor - 11/16” wrench
How to get started
A prerequisite to being able to contribute safely and productively as a retrofitter is the ability to move up and down a fixed rope. You will need your own ascenders/aiders/gri-gri/whatever else you like to use to accomplish this. The most basic common system is one ascender, one aid ladder, a gri-gri, and an adjustable tether (Petzl Connect Adjust or similar). Moving up from there you can add another ascender, aider, and tether. Ascending a rope with crevasse-style setups like prussicks is not suitable. If you aren’t comfortable with these skills yet, I would suggest getting practice and mentorship in them.
It’s also very beneficial to be comfortable leading at the grade and style you are retrofitting, and ideally in excess of it. I don’t say this to be exclusionary, it can just be difficult to evaluate what needs to be done on a route you are not comfortable climbing. This is true for a 5.8 climber retrofitting a 5.11 sport route, but it’s also true for a 5.11 sport climber retrofitting an alpine or mixed-protection route. You need to be able to see the route through the eyes of the person it’s ‘meant’ for.
Beyond that, you’re at a point where you’re ready to help out. Having your own tools isn’t strictly necessary, it’s something you can build up over time. Seek out people who are involved in the retrofitting community that you can tag along with. You can use their equipment or borrow from the TABVAR retrofitting caches located in Canmore and Calgary. You’ll pick up more and more every time you get out, and eventually you’ll be able to identify and fix up routes on your own. Maybe someday you’ll find yourself with 370 liters worth of Rubbermaids full of tools and bolts, writing your own article about retrofitting.
When to retrofit
As mentioned above, this isn’t an article about ethics, but there are significant ethical considerations. Seek mentorship and ask the community for their input.
Why retrofit
This is a personal question, but here’s some of the reasons why I retrofit:
I want to climb something, and the hardware is crap. Quite a few routes I’ve wanted to climb have had sketchy hardware. I’d rather fix them up first, and then send them safely!
It feels good to contribute. I feel good about myself because of the work I’ve done, and it also makes me feel good when I’m planning future work.
The community really does show love. I’ve gotten so much positive feedback. There are always going to be some opinionated cranks out there, but by and large our community shows great support for well thought out efforts.
To me, there is some cachet associated with it. If I don’t know someone personally, but I know that they’re willing to put their time into retrofitting, I come into any encounter with them with the baseline assumption that they’re a generous person that wants to contribute. I’m always happy to support these people. It’s a bit like meeting other ACMG guides, I have a baseline level of assumption about their risk management, decision making, mountain fitness, etc, even if I don’t know them personally.
TABVAR will over-reimburse your efforts! We’re trialing a system where you get 25% extra back above and beyond your costs, in the form of a discount on the next bulk order. In effect, this means retro four bolts, get one free!
Closing
This is intended to be a living document. Ultimately we’re going to try to incorporate this information in a more formal way on TABVAR’s website. If you have any feedback or questions on this content, please feel free to reach out. I’d love to keep improving this as a long-term resource.